Wednesday, January 16, 2008

Java: Using JRat under Eclipse

I'm speaking at EclipseCon 2008

Recently I was working on a Java based program that hooked into an indexing process to make modifications to the data it was indexing. In this case, it was stripping out HTML formatting and removing unnecessary whitespace. Because this was a Java app, performance was dismal. Under normal circumstances I would have gone with a platform that would provide better native support for my platform, such as C, C++, or even a scripting language like Perl would have sufficed. However that was outside of the requirements for this project.

So to improve performance, I needed a profiler to track down my performance bottlenecks. I tried the Eclipse Performance and Logging tools, only to be really disappointed with the results. And by disappointed, I mean that I received errors when running the Eclipse profiler so I couldn’t get any kind of results. So, my search for an alternative lead me to JRat.

JRat is fairly easy to use. To Launch an application for profiling, you simply append an argument to the Java VM. From Eclipse, this can be done from the Run Dialog, under the Arguments tab.

To demonstrate this, I am using the Prime Number example (not sure why I called it Factorize). The code I am using contains both the unoptimized prime number list and the optimized one. The code is below:


package com.digiassn.blogspot;

import java.util.ArrayList;
import java.util.List;

import java.util.Iterator;

public class Factorize {

private static int MAX_NUMBER = 10000;

public boolean isPrime(int number)
{
if (number == 1)
return false;

for (int x = 2; x < number; x++)
{
if ((number % x) == 0)
{
return false;
}
}

return true;
}

public List getFactors()
{
List factors = new ArrayList();

for (int x = 2; x < MAX_NUMBER; x++)
{
if (isPrime(x))
{
factors.add(x);
}
}

return factors;
}

public List getFactors2()
{
boolean [] list = new boolean[MAX_NUMBER];
List l = new ArrayList();

for (int x = 0; x < MAX_NUMBER; x++)
{
list[x] = true;
}

list[0] = false;
list[1] = false;

for (int x = 2; x < MAX_NUMBER; x++)
{
if (list[x])
{
for (int y = (x * 2); y < MAX_NUMBER; y += x)
{
list[y] = false;
}

l.add(x);
}
}

return l;
}

/**
* @param args
*/
public static void main(String[] args) {
Factorize f = new Factorize();

List l = f.getFactors();
List l2 = f.getFactors2();

for (int x = 0; x < l.size(); x++)
{
if (!((Integer)l.get(x)).equals((Integer)l2.get(x)))
{
System.out.println("Something didn't match" + l.get(x) + " " + l2.get(x));
}
}

System.out.println(l.size());
System.out.println(l2.size());
}

}


In the below screenshot, I have jRat installed under C:\Jrat.

Figure 1. Adding JRat to your Eclipse Run

That’s basically it, when you run the program, you will see a whole bunch of output from the console.

Figure 2. Console output

When run with Jrat, it will save its statistics to a file under the project folder that you will need to open in JRat in order to view your statistics. To run JRat to view statistics, you would run the following command:

java -jar shiftone-jrat.jar

Figure 3. The JRat Window.

Above is a screenshot of the file generated by JRat opened and sorted by percentage of time spent in a method. I can see that unoptimized getFactors method is where the program spent a majority of its time, were the optimized getFactors2 barely spent any time at all.

To be fair, this doesn’t offer nearly as much analysis as the Eclipse Profiler. The Eclipse Profiler has the option to test memory allocation sizes as well as execution time, and it provides some very nifty outputs, such as the ability to export class interations into UML diagrams, as shown in the below screenshot.

Figure 4. The Eclipse Profile Perspective.

While I like JRat, I did find a few things I didn’t like. The biggest one is that is isn’t a Eclipse plug-in. While this is actually a pro as well as a con, I have to admit a certain amount of lazyness on my part, and having to jump outside of Eclipse to view my results can be a little annoying. I suppose a plug-in could be built to view these results, however. Next, is the release schedule is a little inconsitent. As of this writing, the last stable release was on 2007-09-11, and before that, it was 2006-07-31. Yikes. I hope the project is still viable.

So if you get into a situation where the Eclipse profiler refuses to work with your application, you might want to give jRat a try.

Wednesday, January 02, 2008

BIRT: Creating Event Handlers in Java

I'm speaking at EclipseCon 2008

Strange, although I wrote about it in this article, I never wrote an article on how to use Java classes as Event Handlers in BIRT. I probably was meaning to, but it was one of those things that slipped my mind. Its taken me a few weeks, but I am slowly coming out of perpetual daze from a series of excessively demanding jobs, the book writing, and the wedding over the past 6 months.

So, in this article we are going to look at how to create an external event handler in Java, and how to get BIRT to call it. I will look at using this in the Eclipse environment only, with a brief explanation on how to get the class to work in a BIRT deployed environment.

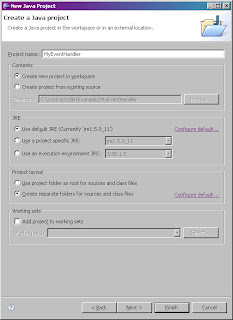
1: Start a new Java project called MyEventHandler.


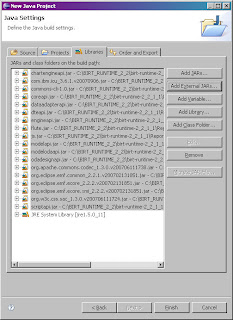
2: In your project, be sure to include the libraries from the BIRT Runtime.


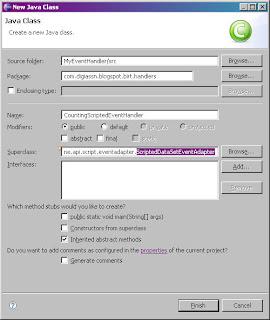
3: Create a new class called CountingScriptedEventHandler. Be sure to include a package, otherwise BIRT will not recognize it. I am not sure why that is the case, it just will not. The class must inherit the org.eclipse.birt.report.engine.api.script.eventadapter. ScriptedDataSetEventAdapter class.


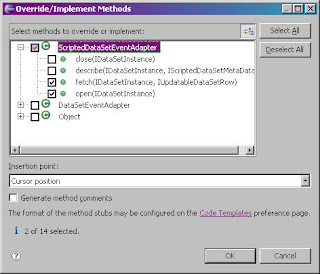
4: Using Eclipses built in Override/Implement method utility, available from the Source menu, pick the fetch and open methods to implement.


5: Use the following code for the Event Handler:

package com.digiassn.blogspot.birt.handlers;

import org.eclipse.birt.report.engine.api.script.IUpdatableDataSetRow;
import org.eclipse.birt.report.engine.api.script.ScriptException;
import org.eclipse.birt.report.engine.api.script.eventadapter.ScriptedDataSetEventAdapter;
import org.eclipse.birt.report.engine.api.script.instance.IDataSetInstance;

public class CountingScriptedEventHandler extends ScriptedDataSetEventAdapter {
int count = 0;

@Override
public boolean fetch(IDataSetInstance dataSet, IUpdatableDataSetRow row) {
try {
if (count < 10)
{
row.setColumnValue("count", count);

count++;

return true;
}
} catch (ScriptException e) {
e.printStackTrace();
}

return super.fetch(dataSet, row);
}
}


6: Save your file. Exit Eclipse and reenter (not sure why the event handler won’t show up without this step, but it won’t). Now, create a report project called MyEventHandlerReport.
7: Create a new report called myEventReport.rptDesign.
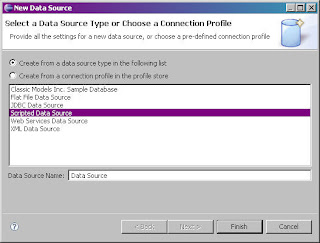
8: Add in a new Scripted Data Source.


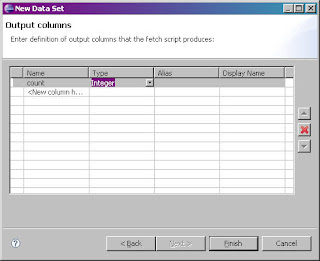
9: Create a new scripted Data Set. Create a single column called count.


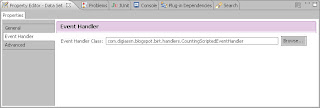
10: Select the data set. In the Property Editor, select the Event Handler tab. Click browse and select the event handler from the list.


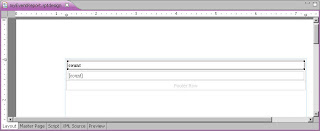
11: Now, select the data set in the Data Explorer, and drag it over to the Report Designer.


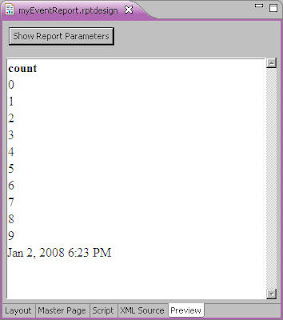
Save and run the report.


Well, that’s cool and all, but how do we get report parameters into this guy. Lets say we wanted the user to able to limit the count themselves instead of using a hardcoded number. Well, we need to get access to the Report Context object, which is not available in the open or fetch method. So instead, we need access to the BeforeOpen method in the parent class. Rewrite the event handler like so:

package com.digiassn.blogspot.birt.handlers;

import org.eclipse.birt.report.engine.api.script.IReportContext;
import org.eclipse.birt.report.engine.api.script.IUpdatableDataSetRow;
import org.eclipse.birt.report.engine.api.script.ScriptException;
import org.eclipse.birt.report.engine.api.script.eventadapter.ScriptedDataSetEventAdapter;
import org.eclipse.birt.report.engine.api.script.instance.IDataSetInstance;

public class CountingScriptedEventHandler extends ScriptedDataSetEventAdapter {
int count = 0;
int MAX_NUM;

@Override
public boolean fetch(IDataSetInstance dataSet, IUpdatableDataSetRow row) {
try {
if (count < MAX_NUM)
{
row.setColumnValue("count", count);

count++;

return true;
}
} catch (ScriptException e) {
e.printStackTrace();
}

return super.fetch(dataSet, row);
}

@Override
public void beforeOpen(IDataSetInstance dataSet,
IReportContext reportContext) {

super.beforeOpen(dataSet, reportContext);

if (reportContext.getParameterValue("MAX_NUMBER") != null)
MAX_NUM = (Integer)reportContext.getParameterValue("MAX_NUMBER");
else
MAX_NUM = 10;
}
}


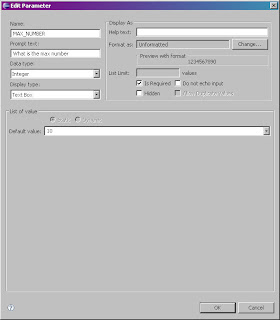
Next, I create a report parameter of type Integer called MAX_NUMBER.


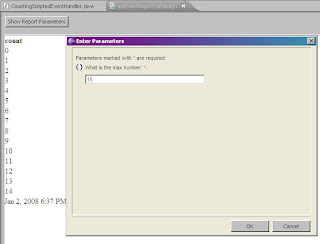
Now, when I run the report, and put in the parameter, it controls the number of results I see.